Showing posts with label teeny tiny wishes stamp set. Show all posts

Wednesday, May 2, 2012

Summer Flag Card

Hey everyone! Hope your week is going well.. As you can see there has been more free time for me and the cardmaking will begin to pick up! I hope your enjoying my tutorials! : )


Here's the card for today! : ) I really like the layered look from the card on Tuesday so I decided to replicate it again some how. I also found these flags from a die cut pack I bought at Micheals Craft store around Valentines Day that I never used so this works out well! : )


Here's the supplies basket for today! : )

My Minds Eye Miss Caroline Paper Pad
K&Company Flag Die Cuts
Versa Mark Ink Pad
Teeny Tiny Wishes Stamp Set
Modern Label Punch
Word Window Punch
Zing! White Embossing Powder
Gel Pen
Small dimensionals
Pink Cardstock
Corner Rounder
Red Gems
Pink organza Ribbon

Thats a mouthful! But great results come with it! ; ) By the way feel free to email me pictures of your designs and you could be featured on the next card tutorial!


Here I did the same layer idea from Teusday's card and I used my 4-1/4x5-1/2 pink base cardstock, the cut my patterned paper at 4-1/4x5-1/2. I then cut some pink cardstock out at 3-5/8x4-7/8.


Here I took my third pink cardstock layer and I corner rounded the edges of the layer and then I cut some pink organza ribbon and addhered it to the back. I took a small red gem and placed it in the bottom left corner as well!


Here I punched out with my Modern Label Punch out of the second layer pattern and then I used my sentiment 'Just For You' And used the same technique as the card on Tuesday.
- Stamp the image/sentiment in VersaMark Ink
- Spread embossing powder over the entire stamped image
- Tap off extra and heat with heat gun
This is so simple and looks great! Then I punched it out with my Word Window Punch and placed dimensionals on the back of it. And adhered the punched images to eachother and then onto the bottom right of the card.


Here I used my flags and spread them out evenly and adheared them to the layer just below the ribbon in a curved shape.


Here is the final look. I used my white gel pen to add some dash lines at the top above the ribbon and a line with bows for where the banner goes. Every detail counts in card! Don't ever forget it! : )

Tuesday, May 1, 2012

Paper Weave Card

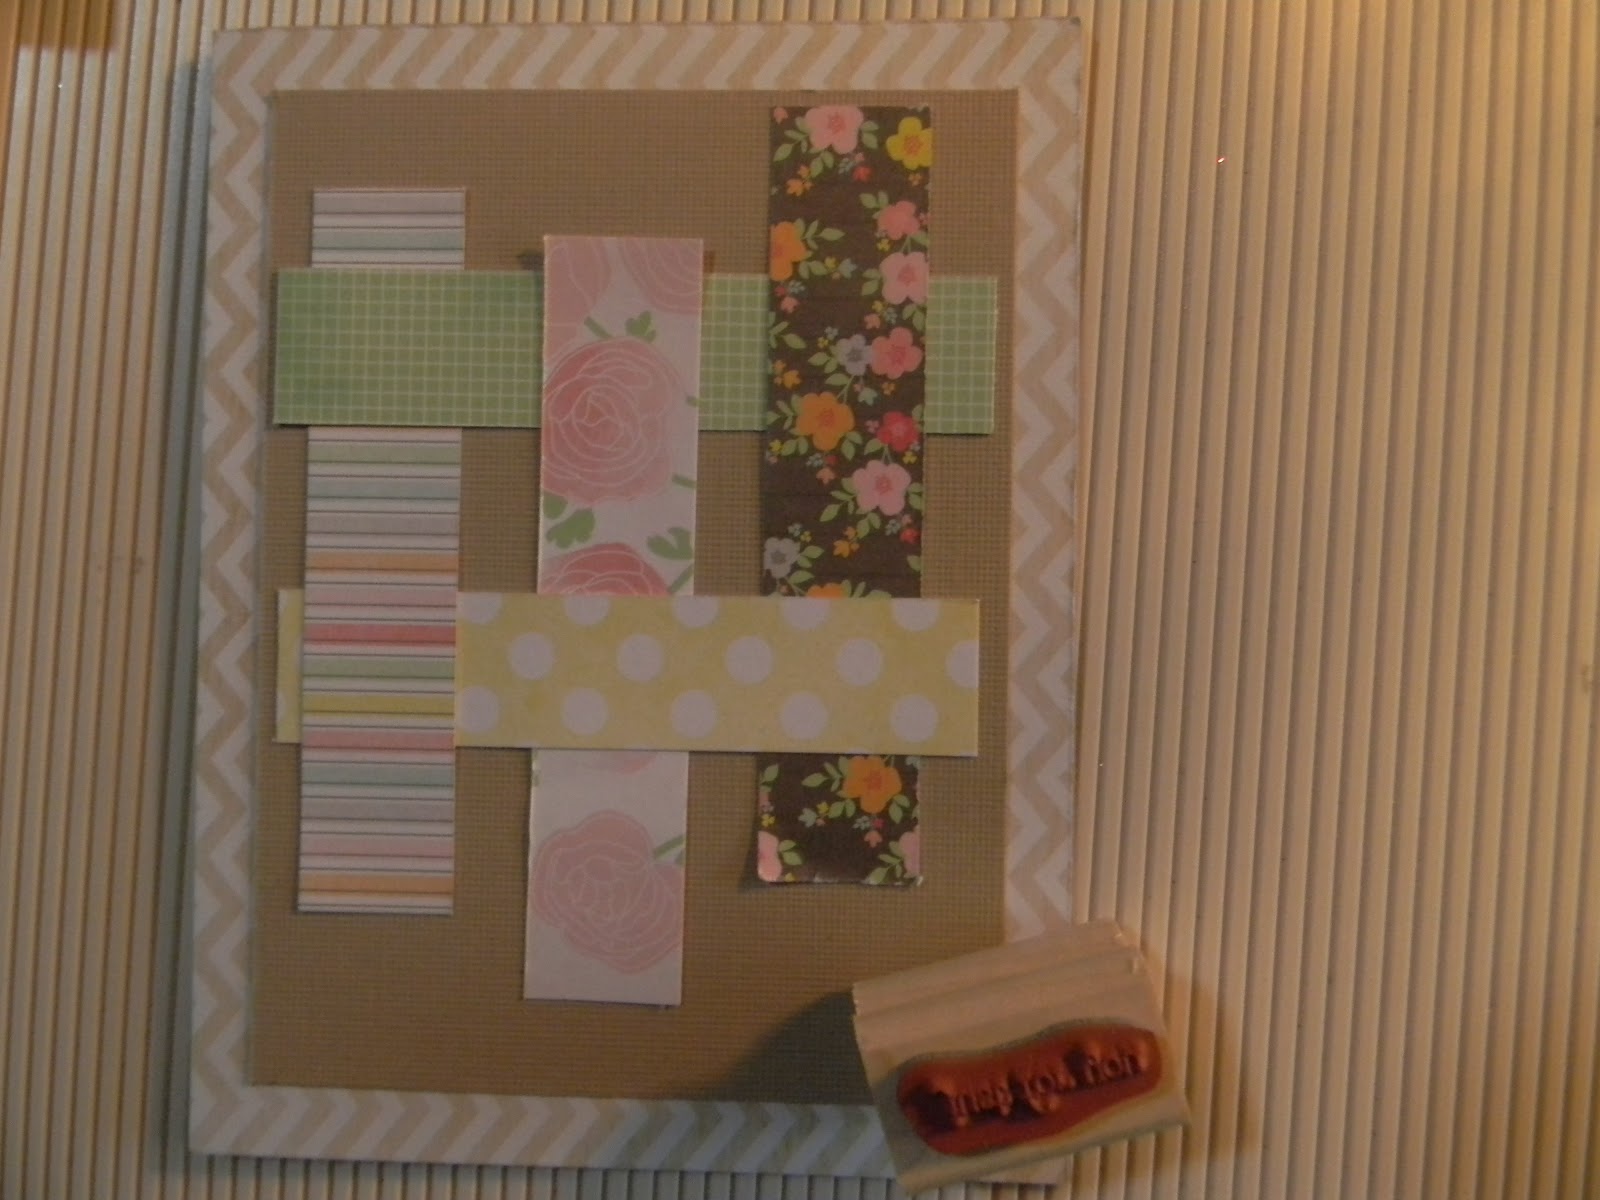
Hey everyone! This paper pad was calling to me so I decided to make a cute card out of it. I love all the paper in this collection, so I saw a Card Map from PageMaps.com and it gave me some good inspiration today! : ) This is the template at the bottom of what gave me inspiration.

Here's my version of the card!

I wanted to make it simple but I got to use all of the patterns in the pad! : D


Guess whats in the basket today!

ZING! White embossing powder
Dear Lizzy paper pad
VersaMark Ink Pad
Kraft Cardstock
Teeny Tiny Wishes Stamp Set
Martha Stewart Scoring Board
Martha Stewart Heat Gun

This card was so easy to make! Shows how some inspiration can go a long way! : )


Here I have my basic Kraft cardstock base of 4-1/4x5-1/2. The pattern paper from the Dear Lizzy Pad is 4-1/4x5-1/2, the same size as the base layer. I decided to use the same colored Kraft cardstock than the white. But the third layer is cut at 3-5/8x4-7/8. 


Here I took my favorite patterns from the pad and cut them into strips of 3/4.


Here is another lok of the strips of paper with the paper pad! I just love this pad! : D My favorite!


Here as you can see I took the strips of paper and started weaving them. I suggest testing it out and experimenting with what you would like to see. I want a sentiment at the bottom right so I made sure to trim it at the bottom later on. (Again I used the Kraft cardstock instead of the white).


Here the strips are marked where exactly I wanted to trim the lengths off.


Here I almost have my finished product! : D I trimmed the strips of paper. I also added that Kraft card layer I've been talking about. Looks a lot better if I do say so myself. But I made sure to trim the darker floral paper up so I can stamp my sentiment. I adhered the first layer onto the base, then the kraft. I finally adhered my strips of paper with the weaved look.


Ok! The last step! I stamped my sentiment in VersaMark Ink and added the embossing powder. I heated it with my Heat Gun and there you go! : ) Warning the heat gun can warp the paper, so I would suggest letting it heat up a bit before you use it and to heat the card itself a bit.


Here is the finished card! I love it! : ) So simple and yet pretty! Thank you for tuning! : ) See you soon!

Sunday, April 8, 2012

Hoppy Easter Card!

Hey Everyone! : ) I'm back! I'm really sorry for the absence! I've been really busy and I have had no time for card making.. But now I am! I will be starting a new segment called Scraping on Sunday. Where I will post a main card on Sunday along with a tutorial. So be aware! : ) But now.. here's the card!


Here's the card for today! It's so cute! : )


Here is the supply basket for today! : )

Cricut Machine
Create a Critter Cricut Cartridge
Stampin' Up! Word Window Punch
Stampin' Up! Modern Label Punch
Stampin' Up! Wild Wasabi Ink Pad
Stampin' Up! Wild Wasabi Cardstock
Light Yellow Card Stock
White Cardstock
Polka Dot Patern Paper
Recollections Pattern Paper Pad
Versa Mark Ink Pad
Versa Mark Ink Pen
Teeny Tiny Wishes Stamp Set
Stamp n Bond Powder
Martha Stewart Green Glitter
Thick Yellow Organza Ribbon
Martha Stewart Scoring Bored
Martha Stewart Heat Gun

You Really don't need all of these.. but I added lots of steps in it today's card!!


So this is what I was originally gonna do with the card.. but I decided not to use the green and yellow patterned paper and not to use the white card stock in the layering. But I used the light yellow cardstock and trimmed it to the standard card size of 4-1/4x5-1/2 inches. Then I trimmed the polka dot green patterned paper to 4x5-1/4.


Here is the layout on my Cricut for you to see how I set up the Bunny and the carrot! The size of the bunny is 3.75 inches. And the carrot is 2.75 inches along with its attachment.


Here's how I laid out the paper! I just followed the lines on the cricut mat. Ignore the smudge on the mat.. Long story! : (


This is what you get at the end of cutting out from the Cricut. Next Layer the layers : ) on top of eachother like so..


I added all of the bunny layers and look how cute he is! : D Also on the carrot I put Green Martha Stewart Glitter on the leaf. Check out the video tutorial page for how to apply loose glitter effectively. Then I adhered the layer on the carrot and added Versa Mark Ink pen with little lines on the carrot! : )


Here I tied the yellow organza ribbon around the green patterned paper and tied it into a little knot. : ) then I adhered it to the Card base. Then with my modern label punch I punched out the white cardstock and then stamped the Happy Easter Sentiment in Wild Wasabi on light yellow cardstock. Then I punched it out from the word window punch.


Here's the finished product! : ) I added the bunny and carrot together and the sentiment up top! Enjoy! Thanks again everyone for being loyal!


Wednesday, March 7, 2012

30 Day Challenge Day Card # 3 - Friend Medallion


Hey everyone, I decided to stick with the medallion theme today : ). I wanted to make this card a little more masculineish haha minus the hearts.. But I love the punch! hahaha! But any way enjoy the tutorial!


Ok here is the supplies! I forgot to add the heart punch in this oopsies! But it wasn't hard to make!

Little Black Dress 6x6 paper pad
Stampin' Up! Teeny Tiny Stamp Set
White Gel Pen
Stampin' Up! Corner Rounder
Stampin' Up! 3/4 Circle Punch
Stampin' Up! 3 Hearts Punch
Scallop Edge Scissors
Kraft Cardstock
Black Ink
Martha Stewart Circle Cutter

There you go! Oh! and a little disclaimer.. The Marth Stewart Circle punch I use takes some practice to get used to.. I'd suggest putting it on a cuttlebug B Mat where it's raised up. But also the cutter blade is super super sharp so just be Careful! : )


I cut a piece of Kraft Cardstock 1-1/8 x 5 inches. Then I used some of the assorted patterned paper from the paper pad I cut them into various strip sizes. I then added adhesive to the cardstock and layerd the strips of paper diagonally.


The result should look something like this! Finish all the way to the other end layering different patterns next to each other. Once that was finished I turned it around and cut the excess off.


I adhered the patterned design we just made on to the standard        4-1/2 x 5 Kraft cardstock. Then I eyeballed the size of the width of the black cardstock but the length of it is 5 inches long. I then used the scallop scissors and trimmed the edge. I layered it over the strips of paper and adhered it down.


With the Martha Stewart Circle Cutter I cut out the creme patterned paper from the paper pad. The size of the circle is 2-7/16 And then with my circle punch I punched out a bunch of circles. I added adhesive to the edge of the circle and added then all around the edge on the back.


This is what the finished medallion should look like : )


Now add the medallion to the card and trim the edge of the piece hanging off the card.


I stamped in black ink this sentiment.


Finally I punched out hearts and adhered it to the middle of the medallion. I rounded the top orners of the card. Lastly I added some white stitching to the card. I hope you enjoy this card as much as I did! Thanks for tuning in! : )

Stay tuned in for 26 more days of cards!


Thursday, March 1, 2012

Pink Birthday Card


Here's another Birthday Card. It's an extremely simple birthday card. I didn't feel good today so I wanted to do a tutorial that was simple. If you guys want to see vidoes instead of pictures. Were also 10 followers away from a giveaway! Keep commenting and sharing your intrests. I always like to hear what you have to say.


Heres the supplies I used! : )

Stampin' Up! 3 Heart Punch
Stampin' Up! Corner Rounder
Kraft Cardstock
White Gel Pen
Light Pink Thread
Stampin' Up! Teeny Tiny Wishes
4 Different types of Pink Pattern Paper
Versa Mark Ink Pad
Zing! Clear Embossing Powder
Martha Stewart Heat Gun

Please comment below if you have any thoughts!


I made a standard cardstock size 4.5x5.5 and scored at 4.25. I cut 4 square pieces of patterned paper at 1-3/8x1-3/8. 


Here I rounded the corners of the four squares, but as you can see above, their rounded at opposite edges and the rounded corners are pointed in. Then I used my white gel pen to stich around the top right square. I had an extra creme heart in my scraps so I added dimensionals to it and adhered it to the top right square.


Here I cut a little slit in the crease for the string to wrap around the card. I wrapped the string about 2-3 times then tied it in a bow.


I stamped the bottom right of the card with the happy birthday sentiment in VersaMark ink and covered it in Zing! Clear Embossing Powder. Then I waved over this with a heat gun. Check out the tutorial at "The Basics" tab.


Here's the finished card! I hope you like it! I just went around the edge with my White Gel Pen and stitched it.

Thanks for reading! Please leave any comments!


Wednesday, February 29, 2012

Cheetah Birthday Card


Hey everyone! I have so many friend birthdays coming up in the next month I wanted to make cards for them! This one was designed for my friend who loves Cheetah : )


Heres a list of supplies I used for the card! And up above is a visual list. : )

Stampin' Up! Corner Rounder
Stampin' Up! Word Window Punch
Stampin' Up Modern Label Punch
Stampin' Up! 3 Hearts Punch
Scallop edged scissors
Kraft Cardstock
Creme Cardstock
Black Cardstock
Patterned Paper (Cheetah)
Creme Ribbon
White Gel Pen
Black Ink
Teeny Tiny Wishes Stamp Set

Enjoy!!


Here I started with my Kraft cardstock base and its a standard size at 4.25x5.5. Then if you can see up above I marked with pencil on the creased side about .75 on either side. Then I cut the patterned papper to fit between the marks. I cut the Cheetah at about 3.5 and rounded the corners on the right side top and bottom of the card base and Cheetah print.


I punched out black hearts with my Stampin' Up! 3 Heart Punch, and Punched out black with the Modern Label, and creme with the Word Window Punch. I stamped the Happy Birthday sentiment in black on the creme cardstock. I added dimensionals to the creme cardstock and 3 hearts.


I trimmed black cardstock strip to size of the card, .5x4.25. Then I trimmed it with my scallop border. I adhered the Cheetah paper to the base and the closer to the bottom of the Cheetah paper I adhered the scalloped paper. Here I cut into the crease of the card with scissors so I could thread my creme ribbon.


Adhere the ribbon to the back of the card front and adhere the black hearts and sentiment. Lastly I added some white stiching to the side of the cheetah paper. I hope you enjoyed this card and tune in for some more ideas! Keep Scrapin!