Showing posts with label Scalloped sciscors. Show all posts

Wednesday, March 7, 2012

30 Day Challenge Day Card # 3 - Friend Medallion


Hey everyone, I decided to stick with the medallion theme today : ). I wanted to make this card a little more masculineish haha minus the hearts.. But I love the punch! hahaha! But any way enjoy the tutorial!


Ok here is the supplies! I forgot to add the heart punch in this oopsies! But it wasn't hard to make!

Little Black Dress 6x6 paper pad
Stampin' Up! Teeny Tiny Stamp Set
White Gel Pen
Stampin' Up! Corner Rounder
Stampin' Up! 3/4 Circle Punch
Stampin' Up! 3 Hearts Punch
Scallop Edge Scissors
Kraft Cardstock
Black Ink
Martha Stewart Circle Cutter

There you go! Oh! and a little disclaimer.. The Marth Stewart Circle punch I use takes some practice to get used to.. I'd suggest putting it on a cuttlebug B Mat where it's raised up. But also the cutter blade is super super sharp so just be Careful! : )


I cut a piece of Kraft Cardstock 1-1/8 x 5 inches. Then I used some of the assorted patterned paper from the paper pad I cut them into various strip sizes. I then added adhesive to the cardstock and layerd the strips of paper diagonally.


The result should look something like this! Finish all the way to the other end layering different patterns next to each other. Once that was finished I turned it around and cut the excess off.


I adhered the patterned design we just made on to the standard        4-1/2 x 5 Kraft cardstock. Then I eyeballed the size of the width of the black cardstock but the length of it is 5 inches long. I then used the scallop scissors and trimmed the edge. I layered it over the strips of paper and adhered it down.


With the Martha Stewart Circle Cutter I cut out the creme patterned paper from the paper pad. The size of the circle is 2-7/16 And then with my circle punch I punched out a bunch of circles. I added adhesive to the edge of the circle and added then all around the edge on the back.


This is what the finished medallion should look like : )


Now add the medallion to the card and trim the edge of the piece hanging off the card.


I stamped in black ink this sentiment.


Finally I punched out hearts and adhered it to the middle of the medallion. I rounded the top orners of the card. Lastly I added some white stitching to the card. I hope you enjoy this card as much as I did! Thanks for tuning in! : )

Stay tuned in for 26 more days of cards!


Wednesday, February 29, 2012

Cheetah Birthday Card


Hey everyone! I have so many friend birthdays coming up in the next month I wanted to make cards for them! This one was designed for my friend who loves Cheetah : )


Heres a list of supplies I used for the card! And up above is a visual list. : )

Stampin' Up! Corner Rounder
Stampin' Up! Word Window Punch
Stampin' Up Modern Label Punch
Stampin' Up! 3 Hearts Punch
Scallop edged scissors
Kraft Cardstock
Creme Cardstock
Black Cardstock
Patterned Paper (Cheetah)
Creme Ribbon
White Gel Pen
Black Ink
Teeny Tiny Wishes Stamp Set

Enjoy!!


Here I started with my Kraft cardstock base and its a standard size at 4.25x5.5. Then if you can see up above I marked with pencil on the creased side about .75 on either side. Then I cut the patterned papper to fit between the marks. I cut the Cheetah at about 3.5 and rounded the corners on the right side top and bottom of the card base and Cheetah print.


I punched out black hearts with my Stampin' Up! 3 Heart Punch, and Punched out black with the Modern Label, and creme with the Word Window Punch. I stamped the Happy Birthday sentiment in black on the creme cardstock. I added dimensionals to the creme cardstock and 3 hearts.


I trimmed black cardstock strip to size of the card, .5x4.25. Then I trimmed it with my scallop border. I adhered the Cheetah paper to the base and the closer to the bottom of the Cheetah paper I adhered the scalloped paper. Here I cut into the crease of the card with scissors so I could thread my creme ribbon.


Adhere the ribbon to the back of the card front and adhere the black hearts and sentiment. Lastly I added some white stiching to the side of the cheetah paper. I hope you enjoyed this card and tune in for some more ideas! Keep Scrapin!


Thursday, February 23, 2012

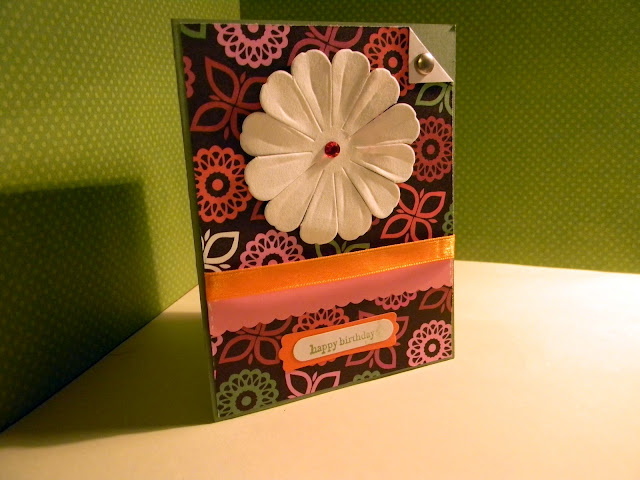
Floral Birthday Card


Hey everyone! I decided to use some scrap paper instead of new paper! Make this a challenge for everyone to make a card with scrap paper! ; ) Enjoy the tutorial! Also I tried a new photo technique hope you like it!

 Here's the supplies I used.. but I forgot to put in the craft sisccors I used in the later pictures and some red jewels.

Stampin' Up! Modern Label Punch
Stampin' Up! Word Window
Stampin' Up! Teeny Tiny Wishes Stamp Set
Scrap orange ribbon
Pattern paper from The Paper Studio
Pewter Brad from The Paper Studio
Scrap White Cardstock
Scrap Stampin' Up! Wild Wasabi Cardstock
Scrap Pink Cardstock
Scrap Orange Cardstock
Stampin' Up! Wild Wasabi Ink Pad


I cut the Wild Wasabi at a standard card size of 4.25x5.5, then I trimmed the pattern paper 4 1/8 x 5 3/8. Then I folded the corner of my pattern paper and used a hole punch for the brad. This is a large pewter brad, and I wouldn't suggest this size hole punch with smaller size brads.


Next, I trimmed some pink cardstock with some craft scallop edge sisccors, I figured why not? I found these in my collest! No one uses these anymore. It looks pretty spiffy to me ; ). I trimmed the pink to fit the pattern cardstock and adhered this to the top layer.


 Next I added some white stitching around the pink... I would discard that part.. bad descion on my behalf : ). But I just cut some scrap orange satin ribbon to size and adhere this to the back of the patterned paper and adhered the paper to the wild wasabi.
 
 Now I used these two
punches and punched
out the white with the Word Window and Orange with Modern Label.


Here I used a left over paper flower from The Paper Studio and I adhere this to the card. Then I put a small red gem on the middle of the flower. I also stamped the white cardstock with teeny tiny wishes stamp with the Wild Wasabi ink pad and adhered it on the orange punch. Then adhere them to the card at the bottom.


Here's the finished product! Thanks for reading!